Read Time: 14 minute(s)
# Inventory
# Parts
Screen path:
Inventory → Parts
App version (footer): v2.14.0

# Overview
The Parts screen lists all inventory items and their current quantities. From here you can search, filter, sort, create new parts, and navigate through the list with pagination controls.
# Page Layout
# Header
- Zumasys / Inventory product header.
# Section Tabs
- Parts (active)
- Purchase Orders (adjacent tab)
# Toolbar (right of the search box)
- Filters: funnel icon – opens filtering options for the grid (e.g., by quantity or attribute).
- New Part: orange + New Part button – creates a new part record.
# Left Navigation
- Vertical icon bar linking to other modules/areas (icons only).
# Search & Filters
- Search for Parts: free-text field that narrows the grid by part number/description as you type.
- Filters (funnel icon): add structured filters (e.g., show only parts with shortages or with available < 0).
# Grid / Columns
Each row represents a part. The first cell shows the description (or "No description available") and the Part # (e.g., #CAP10, #LEDMOUNT, #10P0005-TEMP).
| Column | What it shows / how it's used |
|---|---|
| Part # | Identifier for the part. Click a row to open details (when available). Sortable. |
| Location | Storage location/bin (blank if not set). |
| On Hand | Quantity physically in stock across the selected scope. Sortable. |
| Committed | Quantity promised/allocated to demand (e.g., orders). Sortable. |
| Allocated | Quantity assigned/reserved to specific jobs/tasks. Sortable. |
| Shortages | Quantity short versus demand (often positive values indicating needed qty). Sortable. |
| Available | Net free quantity. Negative values indicate over-commitment (e.g., -31.17 in the screenshot). Sortable. |
| On Order | Quantity expected from open purchase orders. Sortable. |
Tip: Each column header shows a small up/down indicator. Click to toggle ascending/descending sort.
# Pagination & List Size
- Pagination controls at the bottom:
« ‹ 1 2 3 4 5 › ». - Status text example: "Showing 1 to 10 of 11851 Items."
- Page size selector (bottom-right) defaults to 10 items per page; choose a larger value to see more rows per page.
# Common Tasks
# 1) Find a part quickly
- Click in Search for Parts.
- Type any part number or keyword (e.g.,
LEDMOUNT). - Press Enter or wait for the grid to update.
# 2) Show only parts with problems (e.g., negative available)
- Click the Filters (funnel) icon.
- Add a rule such as Available < 0 (or choose "Shortages > 0").
- Apply filters to update the grid.
# 3) Create a new part
- Click + New Part.
- Fill in required fields (part number, description, units, etc.).
- Save to add it to the list.
# 4) Sort by a quantity
- Click a column header (e.g., Shortages).
- Click again to flip ascending/descending.
# 5) Change how many rows you see
- At the bottom-right, open the page-size dropdown (defaults to 10).
- Choose a larger number (e.g., 25 or 50).
# 6) Switch to Purchase Orders
- Click the Purchase Orders tab near the top of the page.
# Interpreting Values
- Decimals: Quantities may include decimals (e.g.,
31.17). - Negative Available: Indicates demand exceeding free stock (e.g.,
Allocated 31.17and Available-31.17). - Blank Location: Part exists but no location is set (or location column not used).
# Examples Visible in the Screenshot
- Sample part numbers include:
#CAP10,#LEDMOUNT,#NEW.ITEM,#10P0005-TEMP,#10P0065-TEMP,#EJ-TESTLOT1,#PHY-VIE. - The list shows 10 items per page and a total of 11,851 items.
# Footer
- Version link: v2.14.0 (useful when reporting issues).
# Notes & Best Practices
- Use filters to narrow large lists before exporting or mass updates.
- Sort by Shortages or Available to triage inventory issues first.
- If your counts look off, check Committed, Allocated, and On Order to understand why Available may be negative.
# Part (New)
Screen path:
Inventory → Parts → New
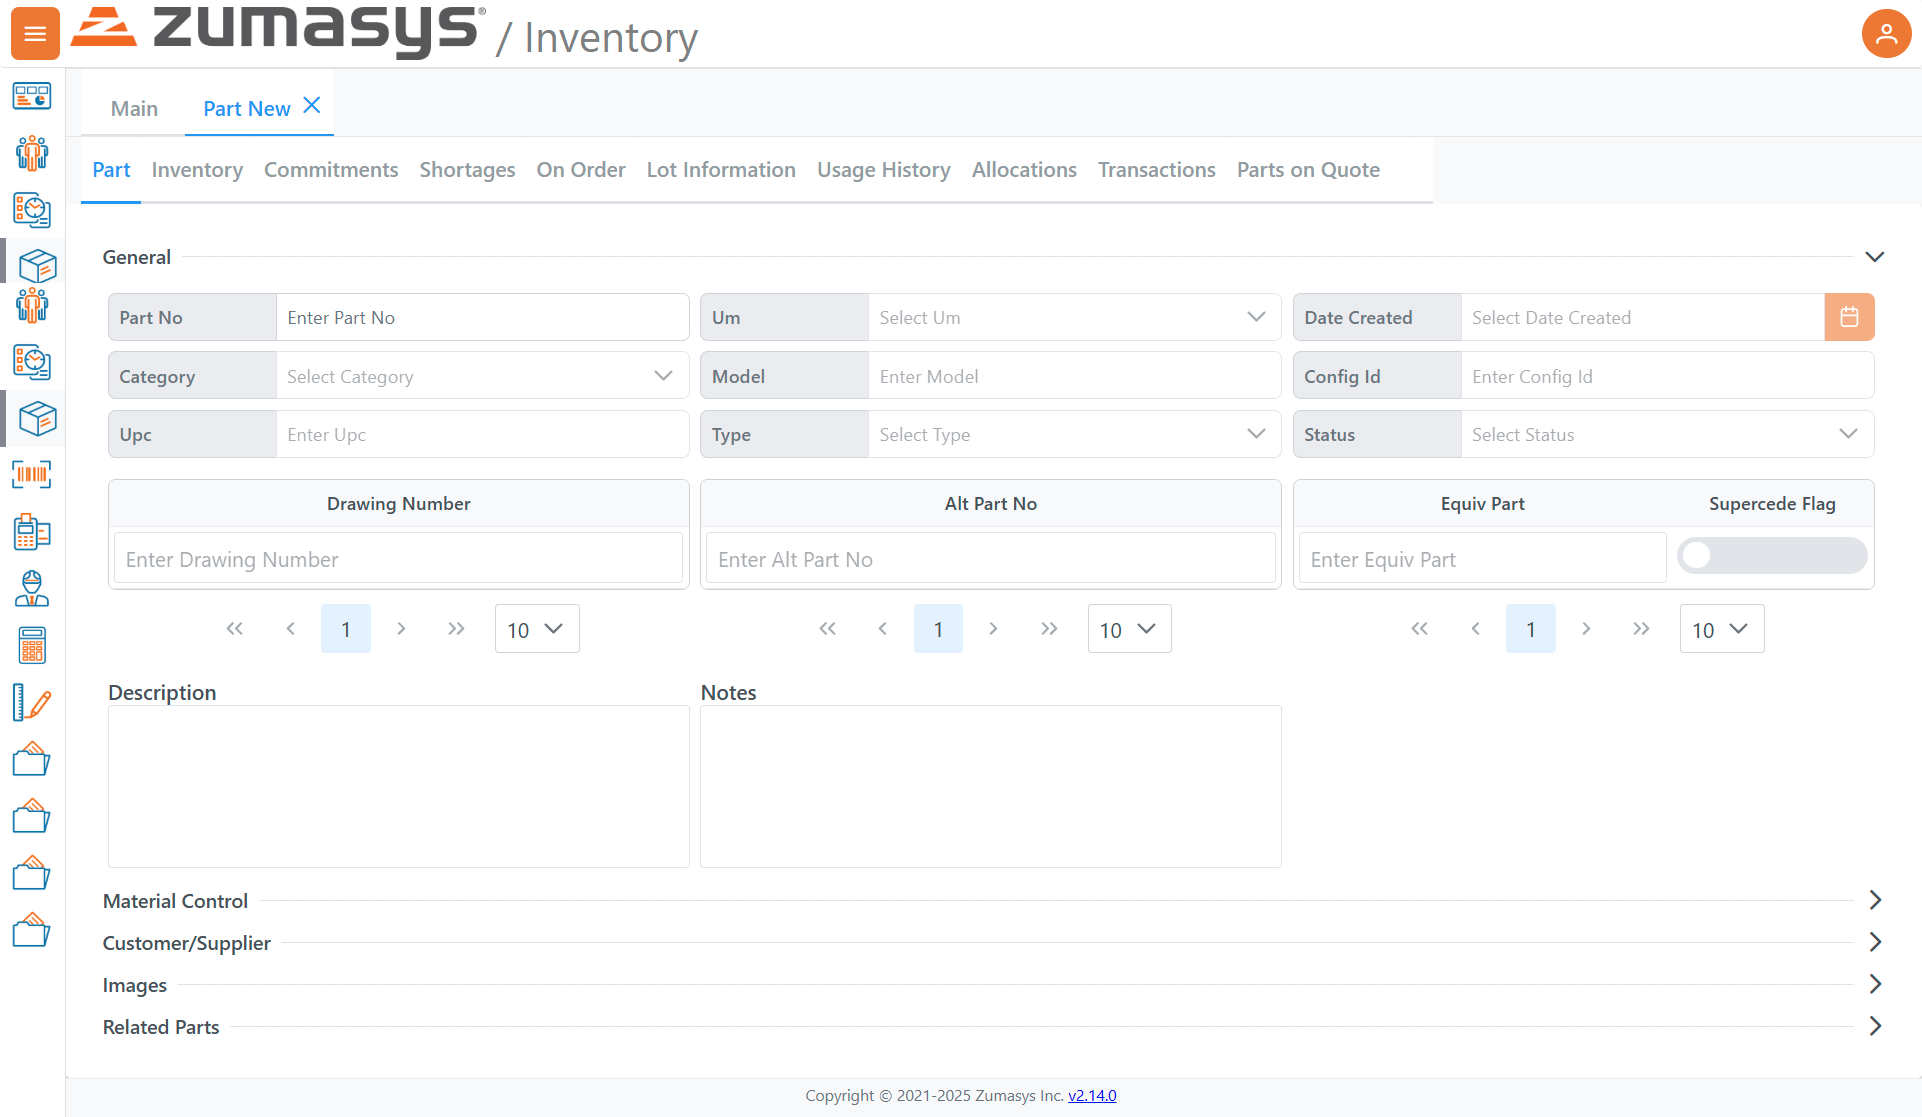
# Purpose
The Part (New) screen is used to create and maintain a part master. It captures identifiers (Part No, UPC), classifications (Category, Type, Model), control flags, alternates/equivalents, and descriptive data that downstream processes (receiving, allocations, orders) rely on.
# Page Layout
# Tabs (within the Part record)
- Part (active)
- Inventory
- Commitments
- Shortages
- On Order
- Lot Information
- Usage History
- Allocations
- Transactions
- Parts on Quote
These tabs surface operational views related to the selected part (stock, demand, history, etc.). When creating a new part, you typically start on Part to define master data, then use the other tabs after saving.
# Collapsible Sections (bottom of the Part tab)
- Material Control
- Customer/Supplier
- Images
- Related Parts
# General (Part tab)
| Field | Description / Use |
|---|---|
| Part No | Required unique identifier for the item. |
| Um (UoM) | Primary unit of measure used for transactions (e.g., EA, BOX). |
| Date Created | Part creation date; calendar picker provided. |
| Category | Classification for reporting/segmentation (e.g., Capacitors, Fasteners). |
| Model | Optional model or family reference. |
| Config Id | Optional configuration reference. |
| Upc | Universal Product Code or other barcode value. |
| Type | Item type (e.g., Finished Good, Raw Material, Non-Stock)—used for rules and reporting. |
| Status | Lifecycle state (e.g., Active/Inactive) controlling availability in transactions. |
# Alternates, Drawings & Equivalents
These fields support one-to-many entries (note the mini pagination controls beneath each).
| Area | Fields | Notes |
|---|---|---|
| Drawing Number | Enter Drawing Number | Track one or more engineering drawings tied to the part. |
| Alt Part No | Enter Alt Part No | Alternate internal numbers or legacy IDs. |
| Equiv Part | Enter Equiv Part | Functionally equivalent parts (often cross-vendor). |
| Supercede Flag | Toggle | Marks that this part is superseded/replaced (behavior depends on your configuration). |
# Descriptive Fields
- Description – Human-readable summary for search and documents.
- Notes – Free-form notes (specs, handling instructions, etc.).
# Collapsible Sections (Details)
Expand each row to edit additional attributes as enabled in your environment.
- Material Control – Stocking policies (e.g., lot/serial control, reorder parameters).
- Customer/Supplier – Customer-specific part numbers, preferred vendors, cost info.
- Images – Upload/reference product images or drawings.
- Related Parts – Accessories, subcomponents, replacements beyond “Equiv/Alt” lists.
# Common Tasks
# 1) Create a new part
- Navigate to Inventory → Parts → + New Part.
- On the Part tab, fill Part No, Um, Category, Type, and Status at minimum.
- Add Description and any UPC/Model/Config Id as applicable.
- (Optional) Add Drawing Number, Alt Part No, and Equiv Part entries (use the small paginator if you add multiple).
- (Optional) Expand Material Control / Customer-Supplier / Images / Related Parts to capture further attributes.
- Save the record. Subsequent tabs (Inventory, Allocations, etc.) populate as you transact against the part.
# 2) Add alternates or equivalents later
- Open the part and go to the Part tab.
- Enter an Alt Part No or Equiv Part, then move with the mini paginator to add more items.
- Save.
# 3) Mark a part as superseded
- Open the part on the Part tab.
- Toggle Supercede Flag on and reference the replacement under Equiv Part (recommended).
- Save. (Your environment may prevent new use of superseded parts in orders.)
# 4) Attach drawings or images
- In the Part tab, add Drawing Number(s); and/or expand Images and upload/link the file.
- Save.
# Tips & Best Practices
Naming: Keep Part No consistent and machine-friendly; use Description for human detail.
Classifications: Set Category/Type/Status correctly up front—many reports and rules depend on them.
Alternates vs. Equivalents:
- Alt Part No = another internal/legacy identifier.
- Equiv Part = a different part that can substitute functionally (often vendor cross).
Supercede Flag: Use when the part should no longer be used and has a successor; link the successor via Equiv Part to guide buyers/planners.
Documentation: Store Drawing Numbers and Images so downstream users can verify specs during receiving and quality checks.
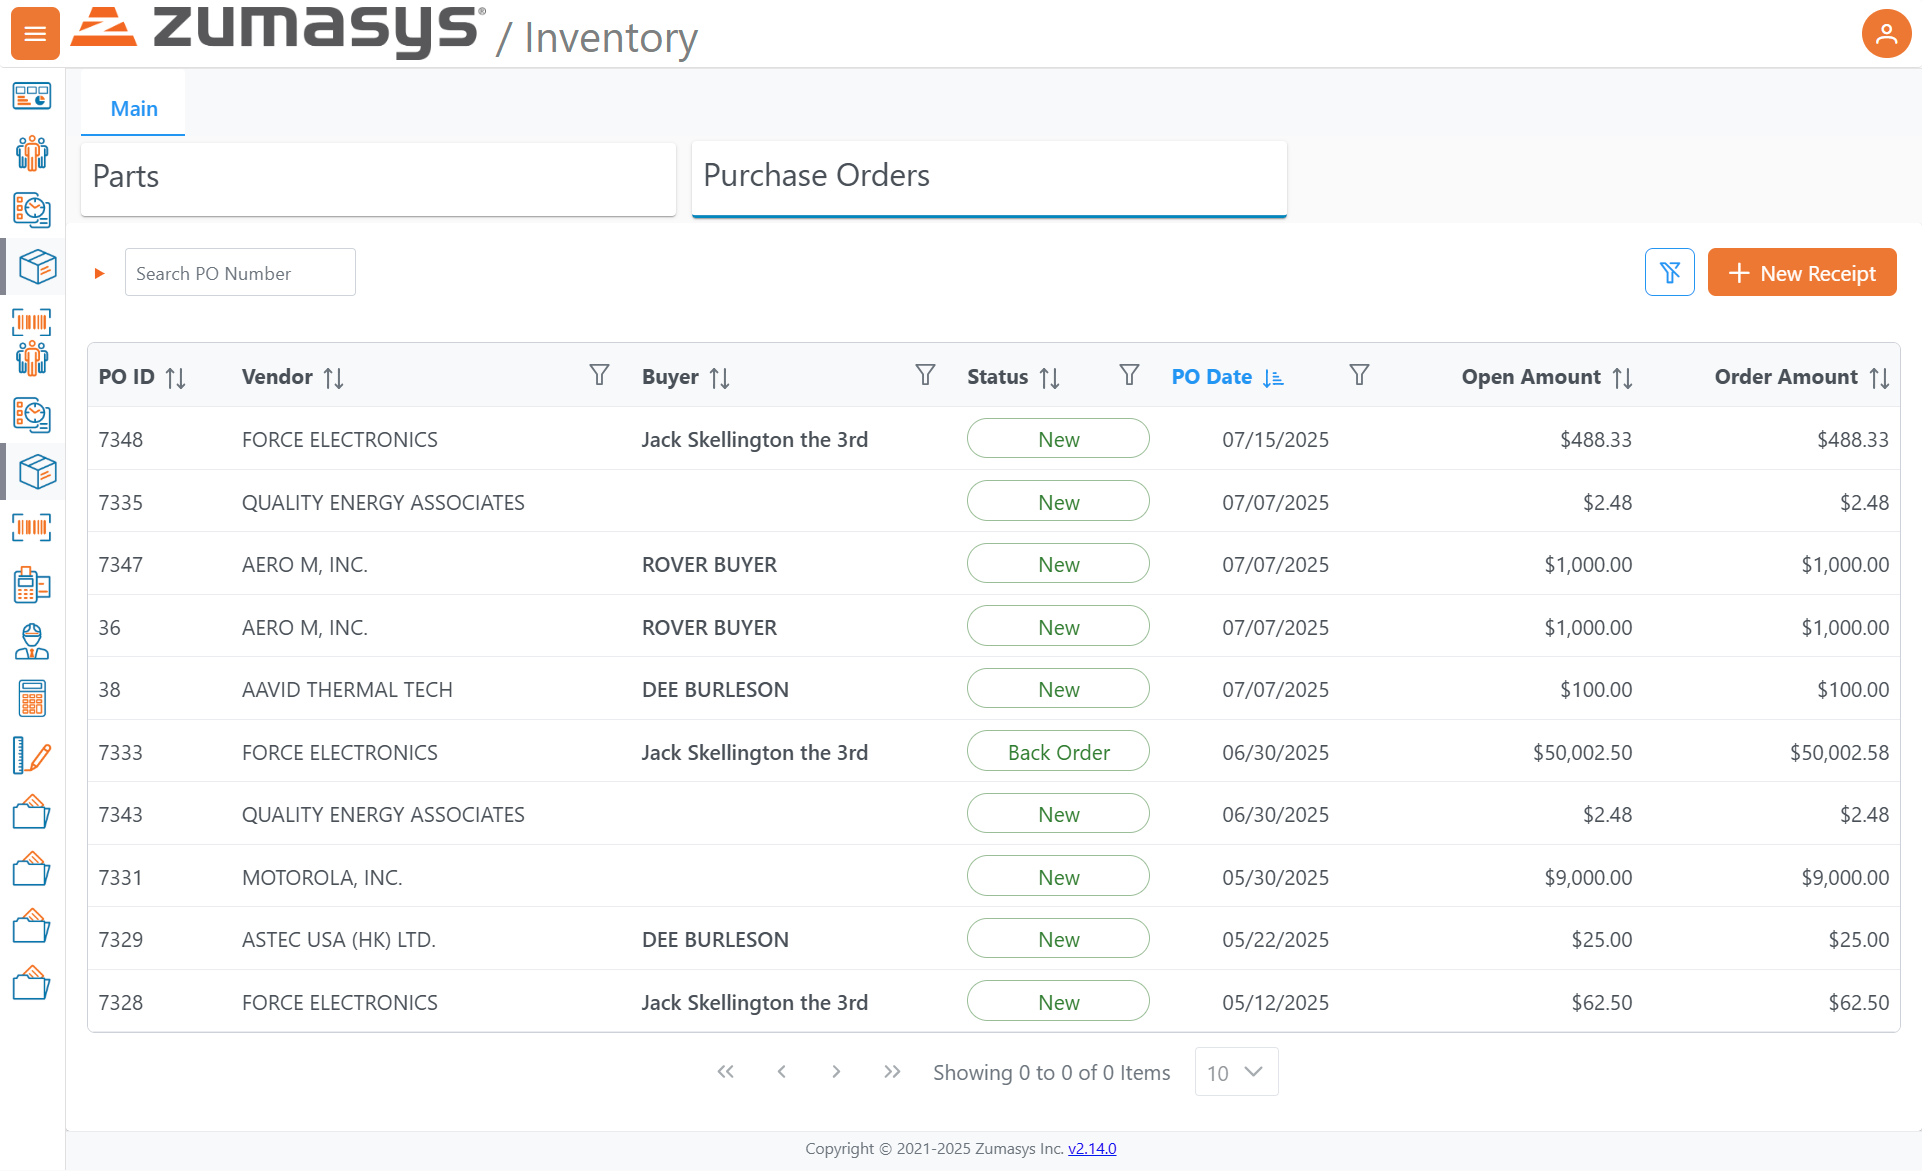
# Purchase Orders
Screen path:
Inventory → Purchase OrdersApp version (footer): v2.14.0
# Overview
The Purchase Orders screen lists open and historical POs, with tools to search, filter, sort, and create receipts against POs. It surfaces key fields—vendor, buyer, status, dates, and monetary amounts—to help you manage inbound supply and match receipts to orders.
# Page Layout
# Header & Tabs
- Parts | Purchase Orders (active)
# Search & Actions (top-right of grid)
- Search PO Number: narrows the list by PO ID as you type.
- Filters: funnel icon – opens column-level or global filters.
- + New Receipt (orange button): starts a new PO receipt (receiving workflow).
# Left Navigation
- Vertical icon bar for navigating to other modules/areas.
# Grid / Columns
Each row represents a purchase order. Column headers are sortable and support filters (funnel icons).
| Column | Description |
|---|---|
| PO ID | Unique identifier for the purchase order. Click a row to view PO details (when available). |
| Vendor | Supplier associated with the PO. |
| Buyer | Person or role responsible for the PO. |
| Status | Current state of the PO. Examples in the screenshot include New and Back Order (rendered as pill tags). |
| PO Date | The order date; shown in MM/DD/YYYY format. |
| Open Amount | The remaining (unreceived/uninvoiced) value still open on the PO. |
| Order Amount | The original total value of the PO. |
Tip: Sort by Open Amount descending to prioritize the largest outstanding POs, or by PO Date to focus on the newest/oldest orders first.
# Pagination & Page Size
- Pagination controls appear at the bottom:
« ‹ 1 2 3 … › ». - Page size selector defaults to 10 rows; increase to view more at once.
- Status text shows the current range (e.g., “Showing 1 to 10 of N Items”).
# Common Tasks
# 1) Find a specific PO
- Click Search PO Number.
- Enter the ID (full or partial).
- Press Enter or wait for the list to update.
# 2) Filter by vendor, buyer, status, or date
- Click the Filters (funnel) icon near the header (or the funnel under a column).
- Add conditions such as Vendor = …, Buyer = …, Status = New, or PO Date is between….
- Apply the filter to refine the list.
# 3) Receive items against a PO
Click + New Receipt.
Select the PO to receive against (if prompted) and add the lines/quantities received.
Save/post the receipt.
- The Open Amount on that PO will decrease accordingly.
# 4) Review back orders
- Filter Status = Back Order.
- Sort by PO Date or Open Amount to prioritize.
- Drill into the PO to view outstanding lines and next steps with the vendor.
# 5) Reconcile values
Order Amount shows the total value originally placed.
Open Amount shows what remains.
- If Open Amount = Order Amount, nothing has been received yet.
- If Open Amount = 0.00, the PO is fully received/closed (or fully invoiced, depending on workflow).
# Interpreting Values & Status
- Monetary formatting: values are shown with currency and thousands separators (e.g.,
$50,002.50). - Statuses: at minimum, you’ll see New and Back Order. Your environment may include additional statuses (e.g., Closed or Cancelled), which will appear as pill tags in the Status column.
- Sorting/Filtering cues: up/down arrows indicate sort order on a column; the funnel icon indicates an active filter.
# Best Practices
- Use PO Date + Status filters to create work queues (e.g., recent POs still New).
- Sort by Open Amount to focus supplier follow-ups where the largest value is outstanding.
- When investigating discrepancies, compare Open Amount with recent Receipts and line-level quantities on the PO details page.
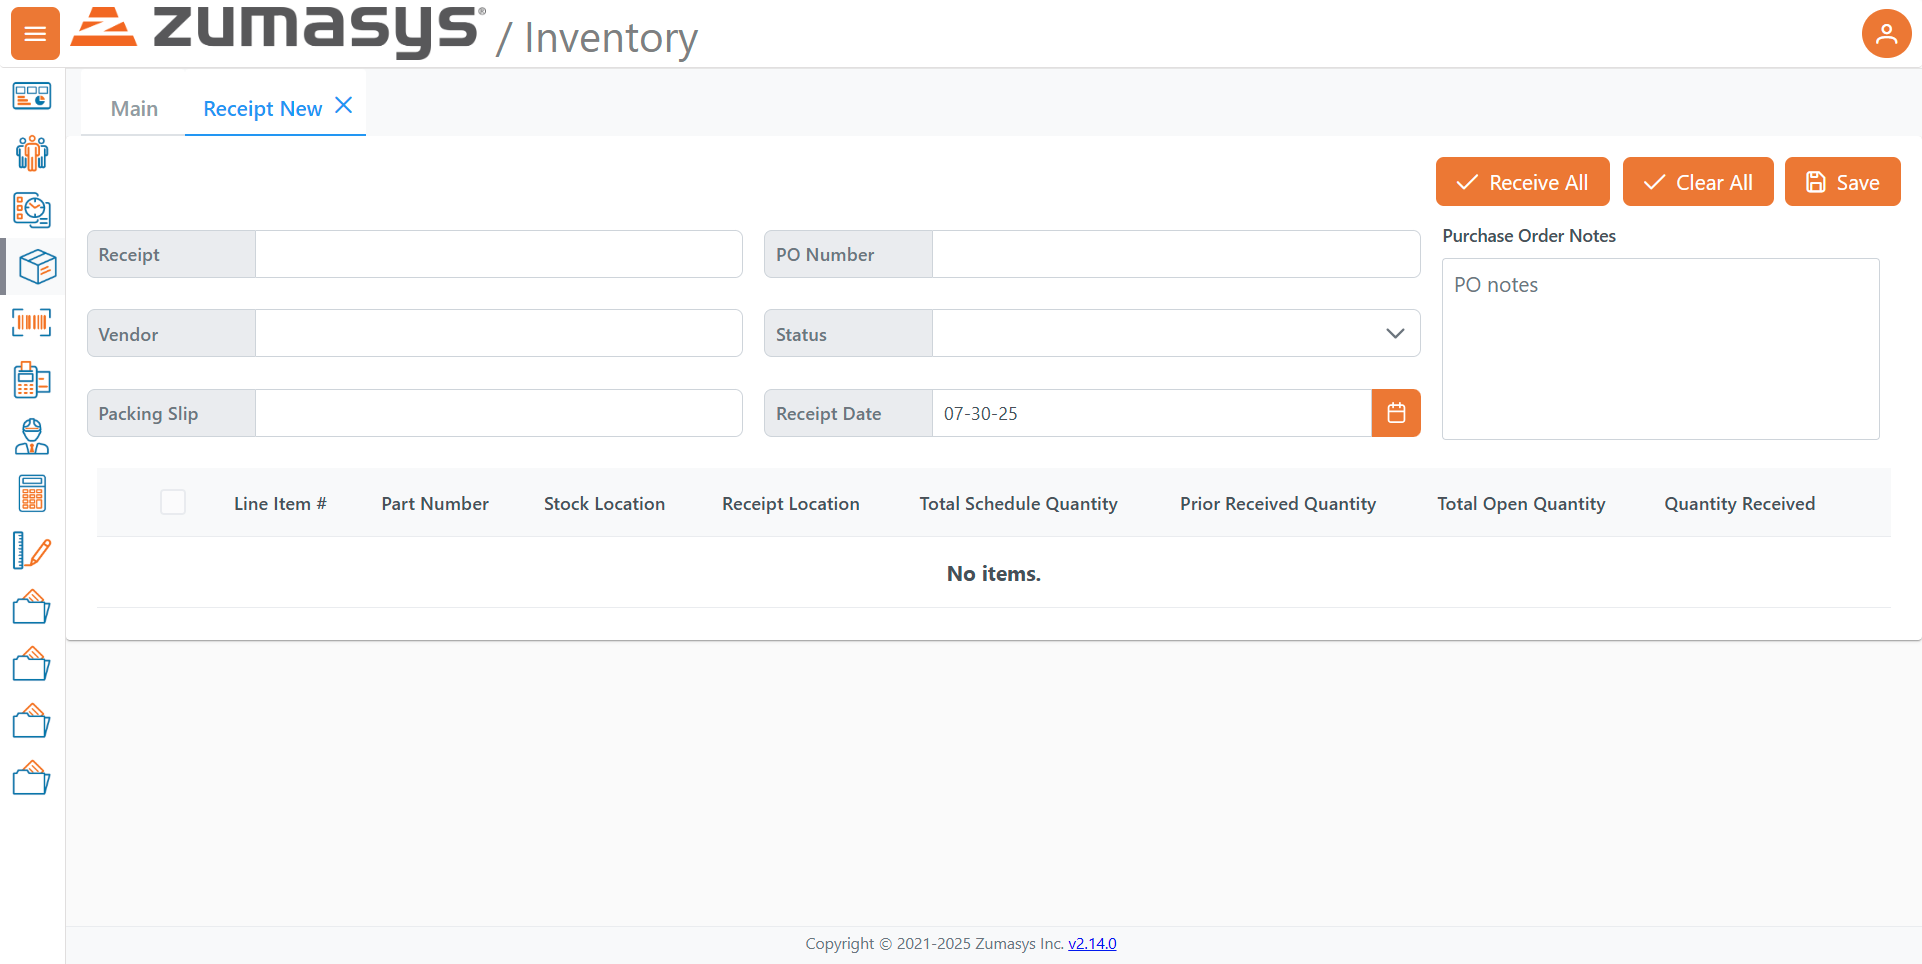
Below is a continuation of the Markdown documentation, covering the Receipt New page shown in your third screenshot.
# Receipt (New)
Screen path:
Inventory → Receipts → New
# Purpose
The Receipt (New) screen is used to record inbound goods against an existing Purchase Order (PO). Once a PO is selected, its open lines appear in the grid so you can confirm locations and enter the Quantity Received for each line.
# Page Layout
# Tabs
- Main
- Receipt New (active)
# Left Navigation
- Vertical icon bar to other modules/areas.
# Header Actions (top-right)
- Receive All – Prefills Quantity Received with each line’s Total Open Quantity.
- Clear All – Sets all Quantity Received values to zero/blank.
- Save – Saves the receipt with the entered values (and advances per your environment’s workflow).
# Header Fields
| Field | Description |
|---|---|
| Receipt | System-generated or user-entered identifier for this receipt. |
| PO Number | Choose the Purchase Order you are receiving against. Selecting a PO loads its lines into the grid. |
| Vendor | Populated from the selected PO. |
| Status | Dropdown indicating the receipt’s state (e.g., new/draft/posted as defined by your setup). |
| Packing Slip | Reference number from the supplier’s packing slip. |
| Receipt Date | The effective date of receipt; calendar picker available. |
| Purchase Order Notes | Free-text area for receiving notes (shown at right). |
Note: The grid below initially shows “No items.” until a PO Number is selected.
# Line Items Grid
Once a PO is chosen, its open lines appear with the following columns. Use the row checkbox to select individual lines if needed.
| Column | Meaning / How to use |
|---|---|
| Line Item # | PO line identifier. |
| Part Number | Item being received. |
| Stock Location | Current/expected stock location (from the PO or defaults). |
| Receipt Location | Where you will store the received goods; adjust as needed. |
| Total Schedule Quantity | Total quantity scheduled on the PO line. |
| Prior Received Quantity | Cumulative quantity already received prior to this receipt. |
| Total Open Quantity | Remaining quantity still open on the PO line. |
| Quantity Received | Enter how much is being received now (or use Receive All to fill with the open quantity). |
# Typical Receiving Workflow
Open
Inventory → Purchase Ordersand identify the PO (optional pre-step).Navigate to Receipt (New) and select the PO Number.
- Vendor and PO notes populate; the grid loads with open lines.
(Optional) Enter Packing Slip and confirm Receipt Date.
For each line: a. Confirm Receipt Location (change if needed). b. Enter Quantity Received (or click Receive All to fill for every line).
Review entries; use Clear All if you need to reset quantities.
Click Save to record the receipt.
- After saving, the PO’s Open Quantity/Amount should decrease accordingly.
# Tips & Best Practices
- Partial receipts: Enter only the quantity physically received; remaining units stay open on the PO for future receipts.
- Negative or over-receipts: If your process disallows receiving more than Total Open Quantity, use Clear All and re-enter valid amounts.
- Locations: Ensure Receipt Location reflects where items will actually be stored to avoid future put-away confusion.
- Dates: Use the Receipt Date to match supplier documents for accurate valuation and aging.
# Troubleshooting
- No items after selecting a PO: Verify the PO still has open lines and that you selected the correct PO.
- Cannot save: Check required fields (e.g., PO Number, Receipt Date) and confirm at least one line has a Quantity Received.
- Totals don’t match expectations: Compare Prior Received Quantity + Quantity Received against Total Schedule Quantity for each line.